Thursday 31 March 2011

Mother's Day Gift Ideas


The date of Mother’s Day differs around the world--for example, whilst in the US and Japan it is celebrated on the second Sunday in May, here in the UK, Mother’s Day – or Mothering Sunday - falls on the fourth Sunday of Lent.

Mothers come in all shapes and sizes, with all kinds of interests and hobbies. They may be birth mothers, surrogate mothers or adoptive mothers. Whatever kind of mother you may have, Mother’s Day is the time to show appreciation for the perfect Mum!

Here are a few Mother’s Day gift ideas, since after all, Mums can be very hard to buy for!

1. Personalised book. Either make one from scratch or order one--a few years ago I used Bob Books to create a photo book for my Mother, from my sisters and I. We filled it with pictures of family and pets, and suffice to say it went down a storm!  There are plenty of other companies online that offer similar services, too.

2. Customised glass. Decorate a glass (be it a wineglass, tumbler or shot glass!) with some glass paints and present it to her with her favourite tipple. (This works well as a Father’s Day gift, too)

3. Homemade cake. Find a recipe for your Mum’s favourite type of cake, and put a message on the top.

4. Mum Vouchers. Make a book of vouchers, each one good for a certain service from yourself. e.g. ‘Breakfast in Bed’, ‘Lunch Out’, ‘A Cup of Tea’ or ‘A Home Pedicure’. This is a great gift to show your appreciation to your Mum, even if you don’t have much money. See my Mother's Day Vouchers printable.

5. Handmade jewellery. Check out my tutorials for Beads & Bow Necklace, Pearly Necklace and Charming Bracelet, or Google for a plethora of other ideas!

6. Sewing kit. Make a personalised pincushion and put together in a nice box with some reels of cotton, tape measure, and a pack of needles.

7. Customised jewellery box. Get a plain jewellery box or findings box and decorate according to your Mum’s tastes. Suggestions: decoupage, paint, shells, sequins, fabric, trim--if you can stick it on, it’s worth considering!

Printable: Mother's Day Vouchers

Here in England, Mothering Sunday falls on 3rd April this year. That's this Sunday.

Hard pressed for cash? Don't know what to buy? Panicking?

Try these printable vouchers!

Just print them off and cut to size (this should print on standard A4 paper/card).

Monday 28 March 2011

Tutorial: Painted Glass

customised glass
Customised glass is a unique and original gift for a friend or family member; it’s also great to add a more personal touch to your home!

Read on to find out how to paint glass yourself to create your very own, one-of-a-kind customised wine glass! This project would be great for Mother's Day.


glass painting

Time needed: 45 minutes (dependent on design; excludes drying times)

You’ll need:
A glass
Contour paste
Glass paints
Paintbrushes
Paper and pen/pencil
Kitchen towel
Water
Newspaper

Note: Contour paste and glass paint can be a little fiddly at first--if you can, try to practice on a spare piece of glass (e.g. empty jar)

 
1. Wash and dry your glass and put down newspaper to protect your work surface.

2. Cut a piece of paper that fits inside your glass and draw out your design. I chose a simple flower design. Try not to put in too much detail, since it will be harder to define with the contour paste. 


3. Slip the paper inside the glass, design facing outwards. Use contour paste to trace over the pattern onto the glass. Leave to dry thoroughly. 


4. Paint in your design with glass paint and allow to dry. (Use kitchen towel to wipe excess paint from your brush and rinse in water in between colours; try to start with the lightest colour!)


5. Pick out any other details you might wish to add. This glass has a nice stem reminiscent of a Roman column, so I decided to pick it out with a vibrant green.
Leave overnight to ensure the paint is entirely dry.


Glass care: Wash with warm soapy water. Do not put in the dishwasher!

Cleaning your brushes: Glass paint can be difficult to wash off brushes--water doesn’t have much of an effect! I cleaned off mine by washing them in brush cleaner to remove the paint, then in warm soapy water to remove the brush cleaner. A small amount of conditioner smoothed through the bristles helps to keep the brush in good condition.

Monday 21 March 2011

Floral Dress Refashion

refashioned dress

The sad-looking old dress below was a recent charity shop find.
Whilst the cut and length were incredibly unflattering, the style somewhat dated, and the buttons really beaten up, I saw potential in this little number! 


dress refashion

So whilst I started off with this...


floral dress refashion
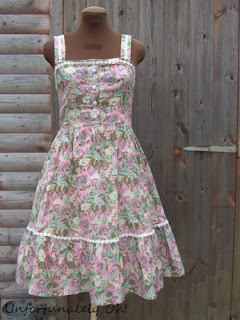
...I ended up with this!

To begin with, I unpicked the skirt and sleeves from the bodice. I didn’t like the neckline so I cut across the top of the bodice, making it (temporarily!) strapless.
Then I cut up the back and put in a zip, adding darts and bringing in the sides of the bodice for a more fitted look.
When it comes to the skirt, I cut off about 1.5-2 inches from the top, gathered it again and sewed it back onto the bodice.


floral dress remake
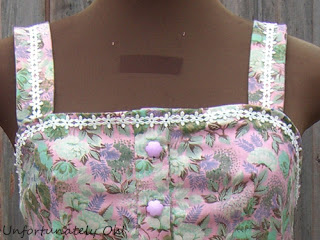
 Using some of the fabric from the sleeves, I made straps and sewed them onto the dress. I swapped the battered buttons for some cute purple flower-shaped ones, and added some daisy trim to finish off.

floral dress refashion
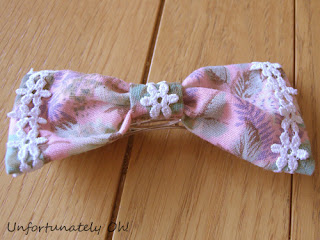
 Since I had some fabric left over, I decided to make a head bow too!


floral dress refasion
 Here’s the dress styled up.
(Alfie decided he wanted to be in the picture too!)


This dress will be great to wear on its own in the summer--the fabric is just the right weight for a summer dress. For the current season I’m wearing it over a shirt or tee, or under a cute cardigan.

This was my first ever dress refashion--and I’m totally happy with it!


Linking up at:


Monday 14 March 2011

Tutorial: Beads & Bow Necklace

beads and bow necklace

This necklace was less than an hour's work, and - besides a few standard jewellery-making findings - used only items I had been given or had lying around the house!

Here's a simple tutorial on how to make your own necklace using ribbon and beads, with a detachable bow.

beads and ribbon necklace

Time needed: 30-60 minutes

You'll need:
  • 1m ribbon
  • Beads*
  • 1 button
  • 2 split rings
  • 2 crimp beads
  • 40cm bead-stringing wire/thread
  • Needle and thread that matches the ribbon
  • Scissors and pliers (cutters and flat-nosed)
*I used 19 13mm beads from a broken necklace, plus 18 0.4mm beads


beads and bow necklace

1.  Thread a crimp bead and one of the split rings onto one end of the bead-stringing wire and make a small loop by pushing the end of the wire back through the crimp bead. Close the crimp bead with flat-nosed pliers.


bead and ribbon necklace

2. Thread your beads onto the necklace and make another loop at the other end of the wire as in part one. You should now have a length of beads with a split ring on either end. 


bead and bow necklace

3. Cut 50cm of ribbon and thread about 12cm through one of the split rings. Put a couple of stitches into the ribbon to secure it. 


bead and bow necklace

4. Wrap the end of the ribbon twice around the split ring (it will also cover the stitch you added in step 3). 


bead and bow necklace
5. Fold over the cut end at the back to conceal and stitch securely at the back. Repeat steps 3-5 for the other side of the necklace. 


bead and bow necklace
6. Make a bow with the remaining ribbon and add a couple of stitches in the back to secure it. Sew on the button.

bead and ribbon with detachable bow brooch necklace

7. For a detachable bow, sew or glue on a brooch back and pin to one side of the necklace. Otherwise, sew the bow directly to the necklace. 


beads and bow necklace

8. Most importantly, enjoy! 

Monday 7 March 2011

Handmade Necklaces

A wise woman (Patsy from Absolutely Fabulous) once said, ‘You can never have enough hats, gloves and shoes.’

The same could be said for rings, earrings and necklaces.

It’s the latter that has been my recent obsession--I can sit down with a head full of ideas and my boxes of recycled and gifted beads and end up with something nice and new to wear around my neck!

Here are a few of my recent creations:

hunter necklace handmade necklace
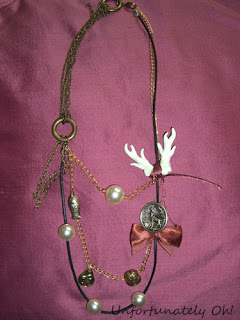
 Hunters Necklace
I made the base of this necklace with a combination of cord and chain (including an old chain bracelet).
The whole inspiration comes from the vintage stag button, which was given to me. Whilst I don’t condone hunting for sport, the theme became ‘hunting in the times of old’, meaning when hunting for food was practically a necessity.

handmade necklace
 Heritage Necklace
This is another necklace inspired by something given to me! In this instance the inspiration came from the old coins, which came into my possession with the holes already in them. The oldest (and largest) coin is from 1881!

hand made button necklace
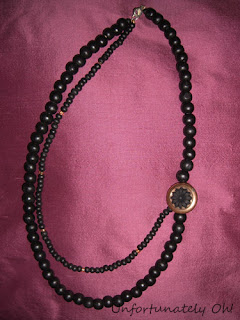
 Black Beads & Button Necklace
The button is the inspiration for this necklace. I wanted a simpler necklace that would allow the button to become a feature, rather than one charm amidst many.
To avoid making the necklace too plain, I included small orangey beads (from a broken necklace) on the strand of smaller black beads.

handmade beads and bow necklace
 Beads & Bow Necklace
I made this one using ribbon from a chocolate box, a gifted button, and a selection of beads. The inspiration was the colour of the larger beads, which came off a broken necklace.
*A tutorial for how to make this necklace is now up!


handmade charms necklace
 ‘Cameo Collage’ Necklace Knockoff
This necklace was made following a tutorial on Flamingo Toes (one of my favourite crafty places to visit!) It’s a knockoff of a necklace by Anthropologie, which is itself gorgeous, but far beyond my price range.
For this necklace I used a heap of charms that had been accumulating in my supplies! These charms came from my Nanny, an uncle, my mum, stuff from my childhood, old necklaces, random charms bought in Glastonbury and even a couple of cheap card-making charms! I’d been saving them up for something special and when I saw the tutorial on Flamingo Toes, I knew I’d found that something!
Related Posts Plugin for WordPress, Blogger...